
The EDI process can be difficult to setup and a time consuming workflow to maintain, so make sure you’re doing it for the “right” reasons. CLC does not require our members to use Polaris acquisitions.
If you just want bestsellers in the catalog for your patrons to place on hold, consider the following. One advantage to being in a large consortium is that many other members will quickly add popular new titles to the system. This allows your patrons to place them on hold and they will then be fulfilled when you add your copies to the system.
The Acquisitions tools and Polaris reports can be helpful for tracking orders and following-up on missing titles from vendors. However, if you already have another accounting method for this part of the process that you plan to continue alongside the Acquisitions process may just end up adding busywork to your ordering process.
EDI Setup
Polaris System Administration Setup
Please provide answers to the following questions in your HelpDesk ticket and CLC will adjust your Polaris settings accordingly.
- Do your vendors add header charges (like shipping/processing charges) to their EDI invoices?
- Do you want Polaris to load these charges automatically. The automated Polaris process can only load them to a single fund.
- Please give CLC the Fund name you would like Polaris to apply the header charges to.
- Note: Header charges can be applied to different funds by adding them manually to the invoice workform after the shipment arrives.
- Do you want items in your POs to be received automatically when the invoice is processed by Polaris?
- Do you want the item circulation status to be changed from on order to in-process when the invoice is processed by Polaris?
- When Polaris processes the invoice files, who do you want the invoice details emailed to (preferably a group)?
- Do you print line item workslips?
- Do you want to be able to print the ASN workslips from the Receive ASN shipments workform?
- Do you want to be notified if a PO line item has hold requests linked to it?
Permission setup
Work with CLC to establish the proper Permission Groups and add staff members to those groupss. You can find out more information about acquisitions permissions in this Polaris Help article.
Locate your branch SAN
- Find the SAN number for your branch and submit it to CLC in a HelpDesk ticket.
- Usually the vendor can provide your SAN number, otherwise you can contact Buy SAN | Bowker | Identifier Services for more information.
- If you plan to drop ship to more than one branch, you will need each branch’s SAN number
- Each branch only has one SAN number, the branch’s SAN number will be the same for all vendor’s being used.
- Because the branch SAN is the same for all vendors, if you’ve already ordered via EDI from this branch, you can find the SAN number for the branch on one of your previous purchase orders.
- This is different from the vendor’s SAN number. Each vendor you order from using EDI will also have SAN number.
Setup your fiscal year and funds
- All funds must be tied to a Fiscal Year, so create the Fiscal Year first.
- Determine if you are going to use the Acquisitions reporting as your ONLY source of account balance information or if the Acquisitions Funds will just be “play money”.
- It is typically easier to give yourself some “wiggle room” in the Polaris Funding structures.
- You’ll typically want to attempt to mirror your actual fiscal structure to make reporting to the Fiscal Office easier.
- It is also helpful to group your funds into a fund hierarchy. If you need additional tips about fund structures, refer to the Polaris Help Files or open a ticket with the CLC.
- Each year CLC will perform a fiscal year rollover.
Vendor Supplier accounts
- Each vendor should provide you with the VENDOR’S SAN number.
- Each vendor should provide you with FTP information for EDI ordering.
- This typically consists of a username and password as well as INCOMING and OUTGOING foldernames
- If this is a common vendor that other libraries use, CLC may be able to copy an existing supplier record to speed up the setup process.
- In some cases if this is a vendor that CLC hasn’t worked with before, we may need to enlist Innovative’s assistance. Depending on the level of involvement required with Innovative, the implementation may result in an integration charge from Innovative that CLC would pass onto the member library.
Setup On Order Item templates
- In order for item records to be created for on-order items, you must setup on-order item templates.
- Item templates contain the material/fine/loan/shelf/collection codes that you want to be automatically filled in when creating item records from an order.
- The item template name MUST ALWAYS begin with On Order or On-Order
- The CLC recommends using the 970 $h matching method. With the 970 $h method, the FIRST TEN CHARACTERS OF THE TEMPLATE NAME ARE USED AS THE “MATCHPOINT”.
- Using the 970 $h method means that you can update the codes used in your item template without needing to contact the vendor.
- To use this method come up with unique item template names for the first ten characters of the template name.
- The On-Order portion of the template name does NOT count against the ten character limit.
- The template names can be longer than ten characters but the first 10 characters must be unique.
Inform vendor of Item Template information for 970 field
- The vendor should automatically create a 970 field in short bib records that they provide you.
- This 970 field should have the following information
- $l (ell) LOCATION CODE Required with CLC
- $f FUND CODE
- $p ITEM PRICE
- $q QUANTITY ORDERED
- $h TEN CHARACTERS OF ITEM TEMPLATE NAME
Import profiles
You’ll need the proper Cataloging import profile to use when loading the MARC record from the vendor’s website. In most cases you’ll be able to re-use a profile from another library, but if a profile needs to be created you should consider the following.
- The profile should match with existing bib records (ISBN, ISSN, UPC, OCLC) in the system
- This will allow you to easily re-order additional copies
- In almost all cases, the existing bib should NOT be overlaid by the incoming bib. The bib that is in the system already has a better chance of being “fuller” than the bib from the vendor’s website.
- You should make sure that the import profile is setup to keep the 970 tags that contain your order information.
EDI Invoice defaults
Invoice defaults are used when information from an invoice file from a vendor cannot match an existing PO line.
Please let CLC know the following Invoice Defaults you’d like to use via a HelpDesk ticket:
- A default title that you would like the system to use
- The default destination location
- The default segment fund
- Do you want to include an alert note if the invoice default is used?
- If so, what should the wording be?
EDI Ordering Outline
This outline is based on feedback from our members on the most common way they go through the ordering process. Many of these workflows could be different for your library depending on the staff members involved, the vendors you use and your overall goals with Polaris Acquisitions.
Selecting Items
- You should consider the following when placing your first acquisitions order or your first order with a new vendor
- Start with smaller orders first. Large orders can be overwhelming when you’re first getting used to the EDI workflows.
- Start with only ordering material that you want to allow patrons to reserve ahead of time. We recommend starting with new bestsellers instead of replacement copies of children’s material.
- Put together cart of material to purchase on vendor’s website
- Download cart as a MARC file from the vendor
- It is against CLC’s policy to place orders for material that doesn’t have a UPC or ISBN number assigned to it.
Importing in Polaris
- Make sure to select proper import profile
- Make sure to note name of record set that is being created
Creating Purchase Order
- Open the bib record set that was created during the MARC import
- Go to Tools → Add all records to… → New Purchase Order
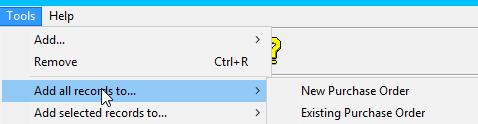
- Assign Fund and Supplier to use for this purchase
Note: Once you’ve added these bibs to a PO, the 970 tag for your location will get a subfield $9 added to mark this 970 line as processed. This signals to Polaris that these 970 lines should be ignored for future PO creation. This means you cannot re-add these titles to a PO again and have them read the order data from the 970s. If you attempt to add processed 970s to a PO, you’ll get a report that says you’re missing fields and the PO line defaults will be used instead.
Instead, you should re-import the vendor MARC file and then create the PO again.
Adding a “Processed” subfield $9 upon PO creation is optional, if you’d prefer NOT to have the subfield $9 added, please open a HelpDesk ticket and ask CLC to adjust this parameter for your location.
Release the PO
Before placing the order with the vendor, the PO needs to be released. During this step you should review the PO line items to make sure the quantities and funds are correct.
- Review the PO and address and problem line items (red exclamation Mark)
- Records that were merged with existing titles may have to have their ISBNs checked before releasing the Order.
- When ready, go to Tools → Release to prepare the PO for ordering
Place the order
- Go to File → Send from the PO to send the EDI FTP file from the vendor
- Because the files are sent directly from the client computer (NOT the Polaris server), you may need to work with your network IT person to allow FTPing from your computer
- This step transmits the order to the vendor’s servers.
- You should check with them to see how frequently they process order files once they’ve been transmitted.
Creating an Invoice
When the vendor ships items to your library, they will generate an invoice file. The Polaris server picks up invoices files and processes them throughout the day.
Receiving the Items
When a shipment of material arrives, there are several methods you can use to receive the line items from the purchase order. The PO must be in the Released status in order to Receive any of the items.
- If you elected during setup receiving can be done automatically when the invoice is received.
- Receive from the Invoice
- Open the Invoice (or link to the Invoice from the PO)
- Select Tools → Rapid Receipt
- Find the item buy using the Line number or the ISBN/ISSN
- See this Polaris Help article for more information
- Receive entire PO
- Open the PO
- Select Tools → Receive from the menu
- Receive by PO line item
- Open the PO
- Go to the Line item view (View → Line Items)
- Right click on the line Item and select the Receive option
Mark invoice as PAID
Paying an invoice will mark any associated funds as expended.
- Open the PO you’d like to Pay
- Go to Tools → Pay
- Follow the prompts to pay the invoice
Final Steps
Before circulating the item, the bib record should be updated to meet CLC’s cataloging standards.
Canceling PO Line items
When line items are canceled the following processes automatically happen:
- Purchase Order Lines Canceled Successfully appears in the status bar
- Funds are disencumbered
- The status of the line item and segments is changed to canceled
- The linked on-order item records are deleted
- Any hold requests are canceled or retained, depending on your response to linked hold request message
- The patrons’ records are updated with the canceled holds, if applicable
- The Display in PAC check box in the linked bibliographic record is cleared (if there are no other linked records)
Note: If the canceled order was prepaid, a credited status appears in the linked invoice line items, an unexpend transaction occurs in any linked funds, on-order items are deleted, and if checked, the Display in PAC check box is cleared (if there are no other linked records).
Troubleshooting
The articles below contain information about common problems that might occur when using Polaris acquisitions.
- Occasionally you’ll try to receive an item and you’ll get an error about a missing invoice. Typically waiting 24 - 48 hours and receiving the item will resolve the issue. For more information see: I've received items from a vendor, but haven't received an invoice. What should I do?
- How do I correct EDI invoice lines that do not link to the PO line?
- If you get an error about a PO that won’t release due to the template missing required fields, open a CLC HelpDesk ticket and reference Staff KB Article #1693
- Before submitting an acquisitions HelpDesk ticket, please review: Information CLC needs when troubleshooting Acquisitions Issues
- Wes’ 2018 presentation on Polaris Acquisitions